Introduction to Q#
A GENTLE INTRODUCTION TO
Writing your first Q# program
The Quantum Development Kit provides a new language, Q#, for writing quantum programs and simulating them using classical resources. Quantum programs written in Q# are run by thinking of quantum devices as a kind of accelerator, similar to how you might run code on a graphics card.

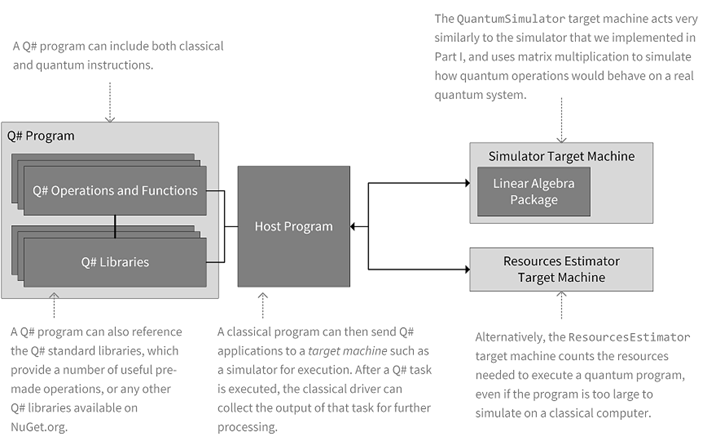
Let’s take a look at this software stack for Q#.
Our Q# program itself consists of operations and functions that instruct quantum and classical hardware to do certain things. There are also a number of libraries that are provided with Q# that have helpful, pre-made operations and functions to use in our programs.
Once the Q# program is written, we need a way for it to pass instructions to the hardware. A classical program, sometimes called a “driver” or a “host program,” is responsible for allocating a target machine and running a Q# operation on that machine.
The Quantum Development Kit provides a plugin for Jupyter Notebook called IQ# that makes it easy to get started with Q# by providing host programs automatically for us.
Using the IQ# plugin for Jupyter Notebook, we can use one of two different target machines to run Q# code. The first is the QuantumSimulator target machine, which is very similar to the Python simulator that we have been developing. It will be a lot faster than our Python code at simulating our qubits.
The second is the ResourcesEstimator target machine which will allow us to estimate how many qubits and quantum instructions we would need to run it, without having to fully simulate it. This is especially useful for getting an idea of the resources you would need to run a Q# program for your application.
Installing the Quantum Development Kit
We need to do a few things to use the Quantum Development Kit with C#, Python, and Jupyter Notebook:
- Install the .NET Core SDK,
- Install the project templates for Q#,
- Install the Quantum Development Kit extension for Visual Studio Code,
- Install Q# support for Jupyter Notebook, and
- Install the
qsharppackage for Python.
Installing the .NET Core SDK
To install the .NET Core SDK, go to https://dotnet.microsoft.com/download and select your operating system from the selections near the top of the page.
Installing the project templates
One thing that might be different than what you’re used to is that both .NET Framework and .NET Core development center around the idea of a project that specifies how a compiler is invoked to make a new binary. For instance, a C# project (*.csproj) file tells the C# compiler what source files should get built, what libraries are needed, what warnings are turned on and off, etc. In this way, project files work similarly to makefiles or other build management systems. The big difference is in how project files on .NET Core reference libraries.
A project file can specify one or more references to packages on NuGet.org, a package repository for .NET Framework and .NET Core software. Each package can then provide a number of different libraries. When a project that depends on a NuGet package is built, the .NET Core SDK will automatically download the right package, and then will use the libraries in that package to build the project.
From the perspective of quantum programming, this allows for the Quantum Development Kit to be distributed as a small number of NuGet packages that can be installed not on a machine, but into each project. This makes it easy to use different versions of the Quantum Development Kit on different projects, or to include only the parts of the Quantum Development Kit that you need for a particular project. To help get started with a reasonable set of NuGet packages, the Quantum Development Kit is provided with templates for creating new projects that reference everything you need.
To install the project templates, run the following command at your favorite terminal:
dotnet new -i "Microsoft.Quantum.ProjectTemplates"
Once the project templates are installed, you can use them by running dotnet new again:
dotnet new console -lang Q# -o ProjectName
Installing the Visual Studio Code extension
To install the extension for Visual Studio Code, open a new Visual Studio Code window and press Ctrl+Shift+X (Windows and Linux) or ⌘+Shift+X to bring up the extensions sidebar. From the search bar, type in “Microsoft Quantum Development Kit,” and press the “Install” button. Once Visual Studio Code has installed the extension, the “Install” button will change to a “Reload” button, which will close Visual Studio Code and reopen your window with the Quantum Development Kit extension installed.
Alternatively, press Ctrl+P or ⌘+P to bring up the “Go To” pallette. In the pallette, type ext install quantum.quantum-devkit-vscode and press Enter.
In either case, once the extension has been installed, to use it, open a folder (Ctrl+Shift+O or ⌘+Shift+O) containing the Q# project you’d like to work on. At this point, you should have everything you need to get up and programming with the Quantum Development Kit!
Installing IQ# for Jupyter Notebook
Run the following from your favorite command line:
dotnet tool install -g Microsoft.Quantum.IQSharp
dotnet iqsharp install
This will make Q# available as a language for Jupyter Notebooks.
Running your first Q# program in Jupyter Notebook
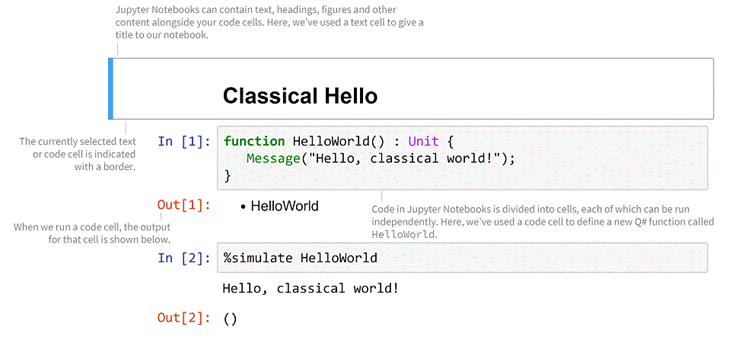
To get a sense for how everything works, let’s start by writing out a purely classical Q# “hello world” application. First, start Jupyter Notebook by running the following in a terminal:
jupyter notebook
This will automatically open a new tab in your browser with the home page for your Jupyter Notebook session. From the New ↓ menu, select “Q#” to make a new Q# notebook. Type the following into the first empty cell in the notebook and press Control + Enter or ⌘ + Enter to run it.
Watch out for semicolons! Unlike Python, Q# uses semicolons rather than newlines to end statements. If you get a lot of compiler errors, make sure you remembered your semicolons.
You should get a response back listing that the HelloWorld function was successfully compiled. To run our new function, we can use the %simulate command in a new cell.

The Q# program is sent to the simulator, but in this case, the simulator just runs the classical logic, since there’s no quantum instructions to worry about yet. You should be proud, nevertheless. You just run your first Q# code!
